As promised, here’s the newest addition to the SV3Power catalog. I’m now modifying 20V headers to fit 16V AW11s! This is an OEM Toyota 20V header, extended to clear the front-mounted starter on a naturally aspirated 4AGE, and fitted with my dual-pattern flange so it will fit both the 16V and 20V 4AGE cylinder heads. Since this is an extended 20V header, it will work with an extended version of my 20V-to-AW11 adapter downpipe, which will soon be added to the downpipe catalog.
Pricing has not been cemented yet, but I will be offering these headers on some sort of exchange basis. In other words, the customer can send me a stock header as partial credit toward the purchase of a modified header, or can send me a stock header after purchase for refund of the core/exchange fee. That should allow me to maintain a supply of parts on hand.
This is pretty big news since so many first-generation MR2s have cracked cast iron exhaust manifolds and rotten downpipes. Now they can replace the cracked manifold and nasty downpipe at the same time, and gain some performance at the same time.
This will be offered for both the Silvertop and Blacktop headers, with the Silvertop being preferred for NA cars and the Blacktop header more ideal for Supercharged cars or well-modified NA engines. I’ll also be adding options for EGR bungs in both stock locations.
If you’re interested in how this work is done, here are some photos.
First, the stock flange must be removed from the 20V header. A fence clamped to the bandsaw keeps the cut straight and ensures that each tube is cut at exactly the same distance from the mounting surface.

Here’s the header with the flange cut off. All four tubes are cut in a nice, straight line.

To extend the header, four identical lengths of tubing are cut on the bandsaw. Since this is an AE101 (Silvertop) header, 35mm OD tubing is used to match the inner and outer diameter of the header’s original tubes.

The four extensions are tacked in place on the header. Note that the header and extensions are both beveled to provide for better weld penetration.

Now the new flange slides over the extensions If this was an AE111 (Blacktop) header, the tubes would be too large to fit through the flange, and would be welded to the outer face of the header instead.

The header is now attached to the jig. A locating plate secures the outlet flange in the correct location, and the nuts at the header flange pull the flange just to the end of the extension tubes.

With the header on the jig, the flange is tacked to the extensions. The header is then removed for final welding. By welding short lengths at a time and moving frequently, distortion is avoided.

Here’s the back of the flange. Note the flush fit of the extension and the thick-wall tubing that matches the OEM dimensions perfectly.

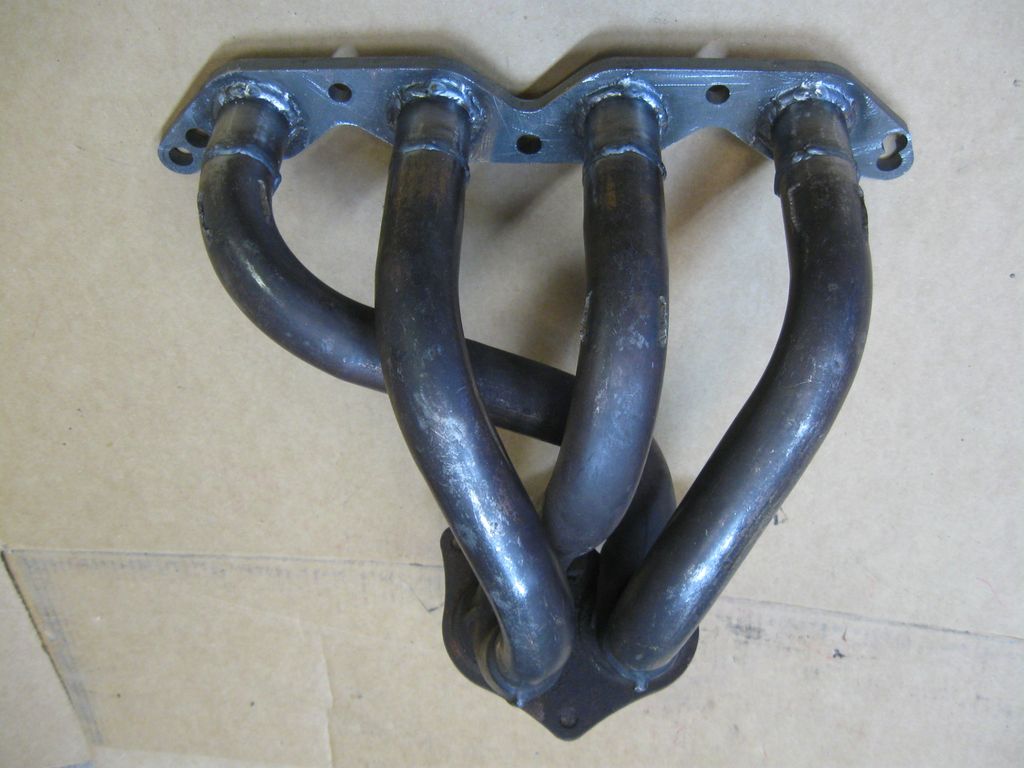
And here’s the final product – a 20V header, extended to fit over a front-mounted starter, and ready to bolt up to either a 20-valve or 16-valve 4AGE.

It doesn’t look all that different until you compare it to a stock 20V header. Here they are side by side:

Still not the best pic, but you can see the difference.
That’s enough for now. Let me know what you think!
Gustavo Almendares
September 20, 2013 at 2:01 PMMan I want to know if these headers with the extended downpipe fit 7age on mr2
SV3Power
September 21, 2013 at 3:58 PMYes, the extended 20V header and matching downpipe will work on a 7AGE.