To shop for parts: Click the tab marked SHOP near the top of any page to visit SV3Power.com/store/.
Continued from Chapter One…
When we left off, the stock cams seemed to be giving me everything they had. It was time to try the Web-Cam 577 cams that I’d had on the shelf for so long. Rumor was that the 4A-GE really preferred a larger intake cam than exhaust, so I tried just the intake cam at first. While I had everything apart I also added degree markings to the homemade adjustable cam gears and reset both cams to their OEM positions. I played hell trying to get the thing to start and run decently because I couldn’t seem to get the distributor properly positioned. I could get it to 10 degrees BTDC, but not back to 5 BTDC where it had been. After fighting that in the dark for too long I gave up and accepted 10 degrees ignition timing. The results were immediately disappointing; though it sounded awesome when the TVIS system opened up, it made noticeably less power.
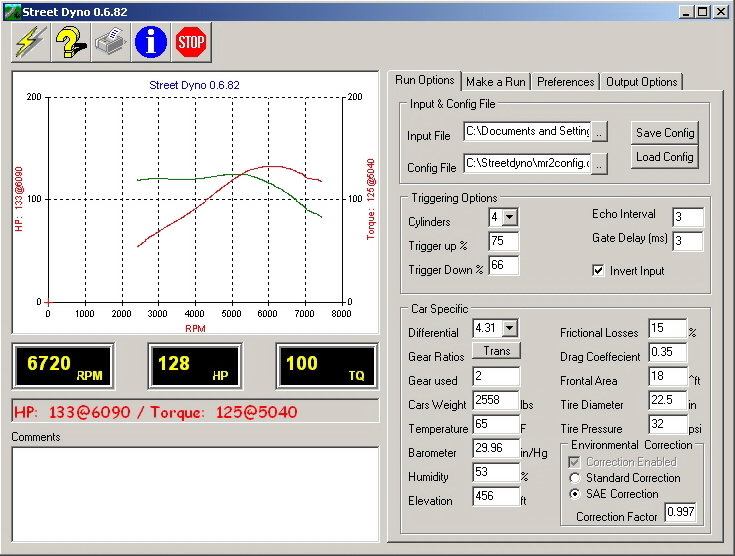
This was really unexpected. I thought that cam was going to set the world on fire. When things get really dumb I usually go through and double-check all the basics. In this case I wanted to be positive that the TDC mark on the crank pulley really meant TDC, so I checked it against piston position using a dial indicator down the spark plug hole. Turns out it didn’t match up. Maybe I had miscalculated it (this was possible since I had to re-mark TDC on the pulley due to the 7A oil pump and tensioner combo), but it was off by five degrees! I remarked TDC on the pulley and reset the cams, which had both been advanced by five cam degrees, and put the ignition timing back to true 10 degrees BTDC. TVIS was still disabled.
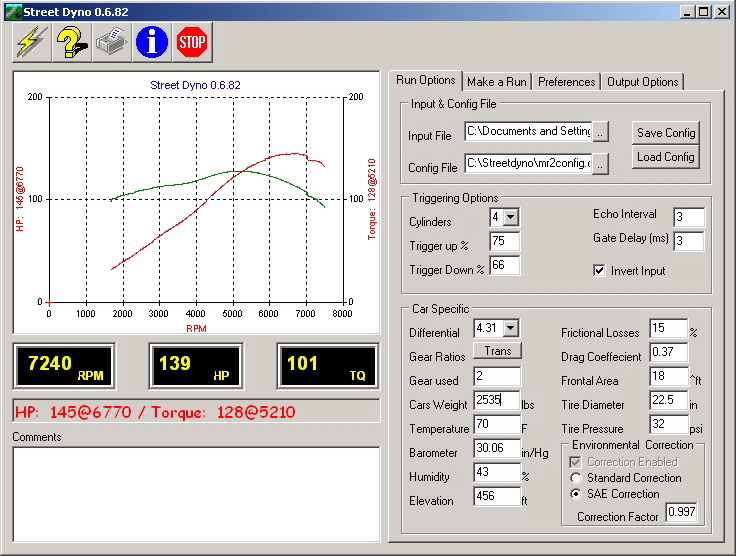
So we hadn’t gained much, but we hadn’t lost anything, either. I reconnected TVIS, which fattened up the torque curve below the peak, and then continued to mess with cam timing, advancing the intake in steps to seven degrees, and then retarding the exhaust cam four degrees.
The horsepower curves were rising steadily until about 5500 RPM and then rose less quickly to the peak. I wondered if there was something restricting the airflow through the engine so I replaced the perforated glasspack resonator with a straight 2 ¼” pipe. I guess the engine liked the resonator, since it gained only one horsepower but lost 2-3 ft/lb of torque between 4000 and 5000 RPM. It may be the volume of the resonator case that provides the benefit. The horsepower curve still slowed its rise at 5500.The resonator was replaced for the remainder of the tests. Further fiddling with cam timing created only minor changes in the numbers so I decided to do something totally pointless and see how much power the air conditioner draws.

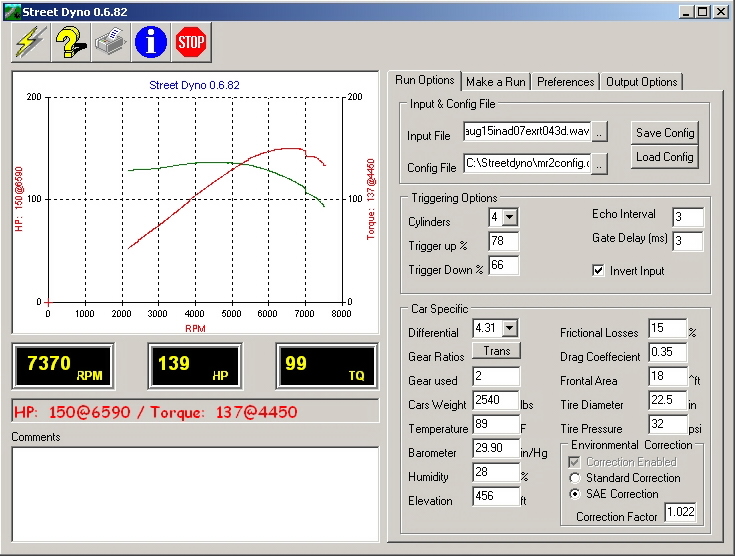
Next I tried the Web exhaust cam. It installed easily enough and I left the cam timing where it had been. The car ran pretty badly at low speeds, idled roughly, tried to stall when coming to a stop, and was generally no fun to drive around town. I made only one run as it was very late when I finished, netting a disappointing set of numbers.
Later that week I retested the car in the exact same configuration and proved the value of never relying on just one run. Whether the car was just not hot enough or I hit a headwind or whatever, that first run didn’t make near the power it did when retested.

If these numbers can be believed, I finally made my original goal of 160hp! Naturally there was more to be gained by further fiddling, and after several runs it seemed happiest with the intake cam eight degrees advanced and the exhaust cam straight up. It was now behaving much better than previously, though it still idled a little roughly and was happier above 2000 RPM. The air conditioner could still be used with no trouble.
So there it is, twenty horsepower more than I started with. Realizing that cam timing alone would not eliminate the part-throttle detonation, I decided to go with a MegaSquirt programmable ECU, which helped drivability a tremendous amount. I also have a couple of different and larger headers to try as the modified silvertop 20V unit only has 1 3/8” primary tubes. There may be ten horsepower and maybe even more hiding in this engine without going to ITBs – though I have a set waiting to go on anyway – or spinning it past 7500 RPM. In fact, I found a bunch of power in an intake manifold swap…
I wanted to try a different intake manifold because the stock manifold is rumored to be at its limit at this power level. People say nice things about the smallport intake manifold, and I happened to have one sitting around. You can see all the changes made to make the manifold work and see why it’s a better match than you’d think on the link titled Adapting the Smallport Intake Manifold, back on the Articles page.
The modified smallport manifold went on without any major drama and the car seemed to run pretty well. I took it out that night after I put it together and it felt great just driving around the neighborhood, so I made a couple of runs to see what effect the manifold had. I never count nighttime runs as official since the weather is different, headlights are up adding electrical draw and changing the aerodynamics of the car, etc, but still, it showed between five and eight extra horsepower. What the peak numbers don’t tell is a substantial drop in torque between 2000 and 5000 rpm. Of course, that’s where you do most of your driving, so if this was a normal passenger car I’d call this experiment a failure. But since there is a lot more average power between redline and the RPM you land at when you upshift at redline, I would say this is a worthwhile modification for performance driving or racing.

The last tweaks I made before jumping to MegaSquirt were to lean the fuel curve by tightening the spring on the airflow meter and move the exhaust cam just a bit.

There may have been more to be had here with further tuning. All in all I am very happy with the performance of this combination, but I’m not completely satisfied.
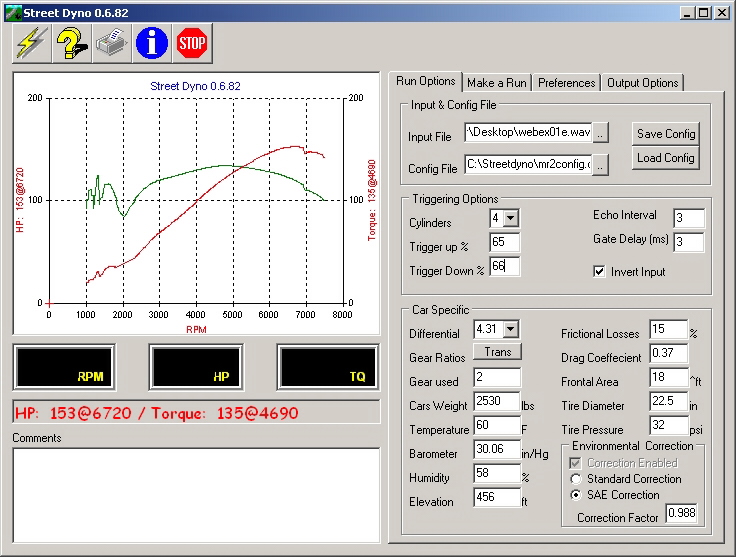
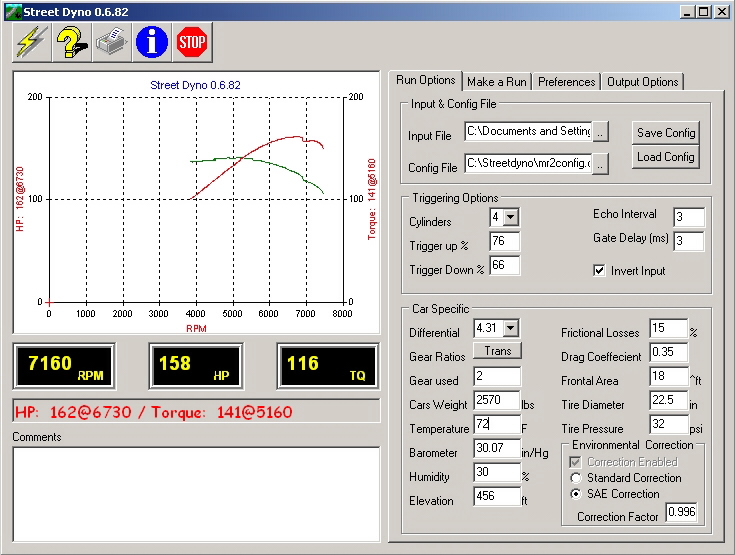
Below is an estimate of the horsepower at the rear wheels. This is the same run as above, but with StreetDyno compensating for 0% friction (drivetrain) loss instead of 15%. Keep in mind that this is for conversation only; until the car sees a real dyno, this is only an estimate of what it should or might put out at the wheels. Still, it’s something to think about, and I’m eager to see how close it actually comes to these numbers.

As of September 2010, the car has been running on MegaSquirt for a few years now, and I still haven’t made time to properly tune it. Dyno time is expensive and the car works well enough for a daily beater. If and when I blow the cobwebs off the laptop and start messing with it again, I’ll add Part Three to the StreetDyno story.
Anyone who wants to try StreetDyno is welcome to download it from me – CLICK HERE – but I don’t have time to provide help with the program. You will need to figure it out on your own. Experimenting with recording levels and the pot on the voltage divider to find settings that provide clean, consistent .wav files is essential. Once you find those settings, leave them alone. Tweaking the Trigger Up and Trigger Down percentages, as well as the Gate Delay value, can be done on a run-by-run basis to make sure you get the longest possible sample. Optimizing those values really helps you get a better sample starting from lower in the RPM range and helps eliminate anomalies such as false dips and peaks. And, once again, it is essential that you take at least three or four runs in any configuration so that you have a good average sample.